The Victron 30 100 is a sophisticated solar charge controller designed to optimise energy yield from solar panels. Equipped with advanced Maximum Power Point Tracking (MPPT) technology, it ensures efficient energy conversion, making it suitable for both residential and commercial solar installations. This device offers several features including overcharge protection, battery temperature sensing, and remote monitoring capabilities via the Victron app. Its robust design and user-friendly interface make it a preferred choice for those seeking reliability and high performance in their solar power systems. This guide provides detailed instructions for installing and configuring the Victron 30 100, ensuring a smooth and effective setup.
Preparing for Installation OF victron 30 100
Before starting the installation, gather essential tools: a screwdriver set, wire strippers, cable ties, and a digital multimeter. Ensure the installation area is safe by turning off all power sources and wearing protective gloves. Familiarise yourself with the Victron 30 100’s components to streamline the installation process. Verify that you have all necessary parts and accessories, including mounting brackets and screws. Check the condition of all cables and connectors for any signs of damage. Prepare the work area to avoid clutter and ensure easy access to the installation site. Have the user manual on hand for reference. Test all tools to ensure they are functioning correctly before proceeding.
Understanding the Components OFvictron 100 30
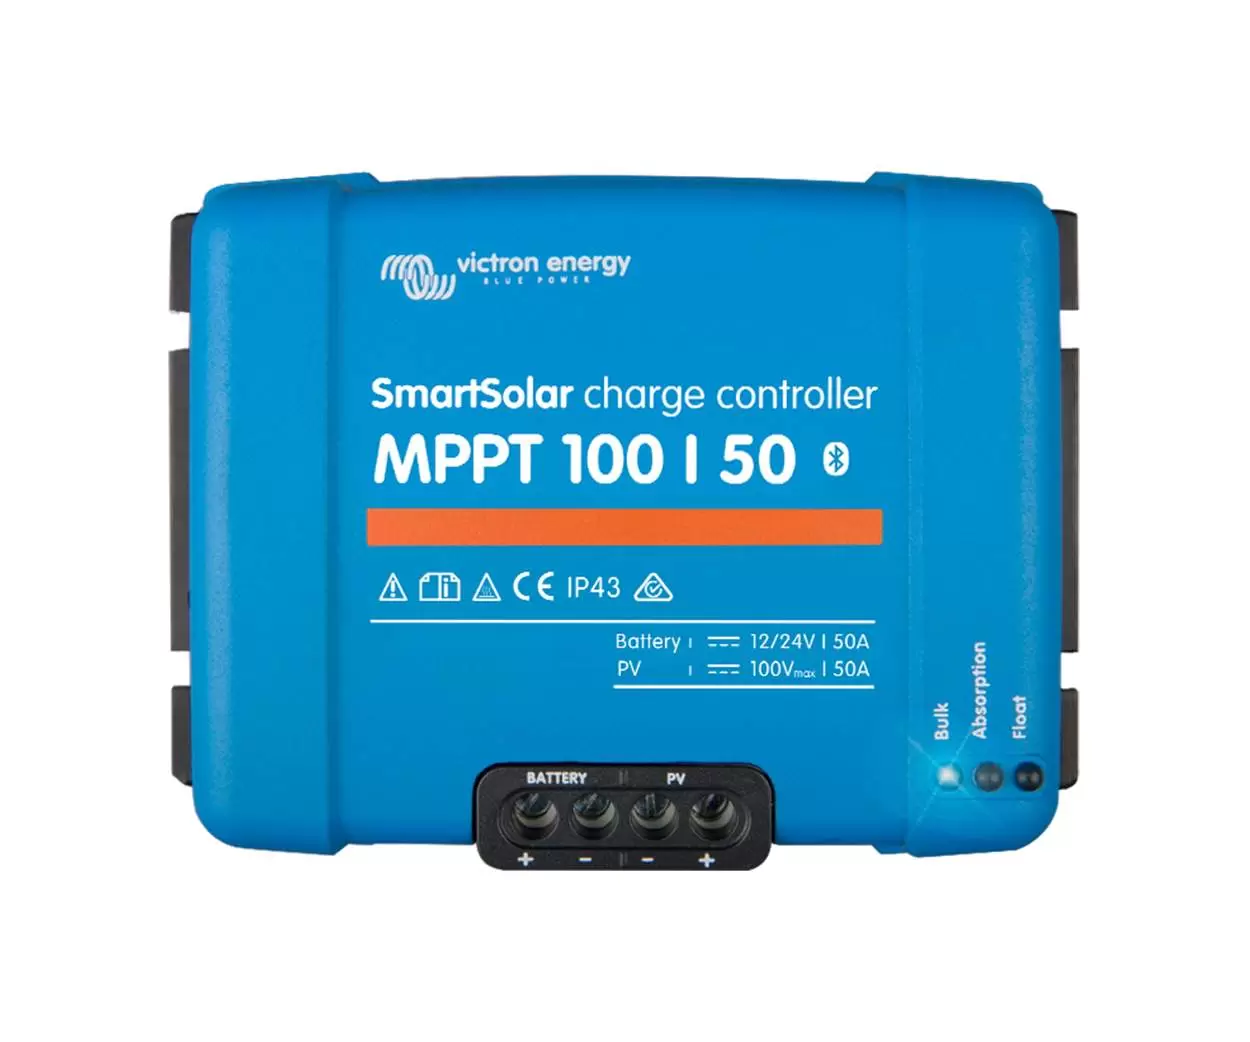
Familiarising with the components of the Victron 30 100 is essential for a successful installation. The package typically includes the Victron 30 100 unit, mounting brackets, screws, and a user manual. Locate the positive and negative terminals for both the solar panel and battery connections. Identify the communication ports used for remote monitoring and firmware updates. Check for the temperature sensor input, which helps in battery management. The MPPT display screen allows for real-time monitoring and adjustments. Ensure you understand the function of each LED indicator on the unit, as they provide vital system status information. Recognise the connection points for any additional accessories or expansion modules.
Choosing the Right Location OF victron 100 30
When selecting the installation site for the Victron 30 100, ensure it is a dry, well-ventilated area away from direct sunlight and extreme temperatures. The device should be mounted vertically to aid in natural cooling. Positioning the unit in a shaded area can help prevent overheating. Ensure there is sufficient clearance around the device to allow for proper airflow. Avoid placing the unit near any sources of moisture or in areas prone to flooding. It is also crucial to choose a location that allows easy access for maintenance and monitoring purposes. Ensure the site is stable and secure, reducing the risk of vibrations or physical damage.
Mounting the 100 30 victron
Begin the mounting process by securing the Victron 30 100 to a stable surface using the brackets and screws provided. Position the device vertically to facilitate natural cooling. Verify that all screws are tightly fastened to prevent any movement or vibrations. Ensure the mounting location allows for proper ventilation and is free from excessive dust or debris. The mounting surface should be capable of supporting the weight of the unit without flexing. Double-check the alignment to ensure it is level. Use a spirit level to confirm the correct positioning. Avoid mounting the device in direct sunlight or near heat sources. Make sure the mounting brackets are installed according to the manufacturer’s guidelines. After securing the unit, inspect the installation for any potential hazards or obstructions.
Connecting the Cables OF100 30 victron
Start by ensuring all power sources are turned off. Strip the insulation from the ends of the cables using wire strippers. Connect the solar panel’s positive cable to the corresponding positive terminal on the Victron 30 100. Secure the negative cable in the same manner. Attach the battery cables, ensuring correct polarity. Use cable ties to manage excess lengths and prevent tangling. Insert the temperature sensor into its designated input. For remote monitoring, connect the communication cables to the appropriate ports. Double-check all connections to confirm they are tight and secure. Use a digital multimeter to verify proper voltage readings. Avoid running cables near sharp edges or high heat sources to prevent damage.
Configuring the System OFmppt victron 100 30
Initial setup steps include powering on the unit and accessing the configuration menu via the Victron app or display screen. Adjust battery type settings to match the battery used, whether it’s lead-acid, AGM, or lithium-ion. Set the charge voltage and current parameters according to battery specifications. Configure the temperature sensor settings to enhance battery management. Enable remote monitoring features by connecting to the Victron app. Update the firmware if needed for the latest features and improvements. Adjust the Maximum Power Point Tracking (MPPT) settings to optimise solar energy capture. Verify the settings by checking system status indicators and performing a trial run.
Testing the Installation OF mppt 100 30 victron
To test the installation, begin by powering on the system and checking the display screen for any error messages. Use a digital multimeter to verify voltage and current readings at the solar panel input and battery output. Confirm that the solar panels are generating the expected power and that the battery is receiving charge. Check the LED indicators on the Victron 30 100 to ensure they show the correct status. Monitor the system using the Victron app to verify remote connectivity and functionality. Inspect all cable connections for tightness and ensure there are no loose or frayed wires. Verify that the temperature sensor is functioning correctly by observing temperature readings in the app.
Troubleshooting Common Problems OFmppt 100 30 victron
Check Power Connections: Ensure all cables are securely connected and polarity is correct.
Inspect LED Indicators: Refer to the user manual for LED status meanings.
Test Solar Input: Use a digital multimeter to verify the voltage from solar panels.
Check Battery Status: Ensure the battery is compatible and in good condition.
Review Configuration Settings: Confirm settings match battery specifications.
Inspect Communication Ports: Ensure all ports are properly connected for remote monitoring.
Monitor Temperature Sensor: Verify the sensor is correctly placed and functional.
Update Firmware: Ensure the device is running the latest firmware version.
Address Overheating: Ensure the unit is properly ventilated and not exposed to direct sunlight.
Verify Voltage Readings: Use a digital multimeter to confirm voltage levels are within expected ranges.
Check for Error Messages: Refer to the display or app for any error codes.
Inspect for Physical Damage: Look for any visible signs of wear or damage on the unit.
Maintenance and Care OFvictron mppt 100 30
Regular Inspection: Perform routine visual checks for any signs of wear or damage.
Cleaning: Keep the unit free from dust and debris to ensure proper ventilation.
Firmware Updates: Regularly update the firmware to maintain optimal performance.
Connection Check: Verify that all cable connections remain secure and free from corrosion.
Temperature Sensor: Ensure the temperature sensor is correctly placed and functioning.
Battery Health: Periodically check battery status and ensure it is compatible and in good condition.
LED Indicators: Monitor the LED indicators for any abnormal status signs.
Ventilation: Ensure the unit is properly ventilated and not obstructed.
Solar Panel Maintenance: Clean and inspect solar panels to ensure maximum efficiency.
Remote Monitoring: Regularly check remote monitoring systems for any alerts or issues.
Voltage Readings: Use a digital multimeter to verify voltage levels periodically.
Physical Damage: Look for any visible signs of wear or damage on the unit.
Enhancing Performance OF victron mppt 100 30
To maximise the efficiency of the Victron 30 100, consider implementing performance-enhancing strategies. This might include upgrading to higher efficiency solar panels or optimising the tilt angle of the panels for improved sunlight exposure. Ensure regular firmware updates for the latest enhancements. Use the temperature sensor to maintain optimal battery health. Avoid shading on solar panels to prevent power losses. Regularly clean the solar panels to ensure maximum sunlight capture. Monitor the system via the Victron app for real-time performance insights. Use high-quality, properly rated cables to reduce power loss and improve overall system efficiency.
Conclusion and Final Thoughts
Proper installation and regular maintenance are crucial for the Victron 30 100’s optimal performance. Ensure correct cable connections, secure mounting, and accurate system configuration. Regularly update firmware and monitor the system via the Victron app. Clean solar panels and check for any physical damage or overheating issues. Follow the detailed troubleshooting steps to address common problems efficiently. Properly manage cables and ensure good ventilation for the unit. Maintain battery health by using the temperature sensor effectively. Ensure all components are in good condition and operate within specified parameters for long-lasting and reliable performance.
Frequently Asked Questions
Q: What is the maximum solar input for the Victron 30 100?
A: The maximum solar input voltage is 100V, with a maximum charge current of 30A.
Q: Can the Victron 30 100 be used with lithium batteries?
A: Yes, it is compatible with various battery types, including lithium-ion, provided the correct settings are applied during configuration.
Q: How often should the system be maintained?
A: Routine inspections are recommended every six months, with additional checks following any severe weather conditions.
Q: What tools are necessary for installation?
A: Essential tools include a screwdriver set, wire strippers, cable ties, and a digital multimeter.