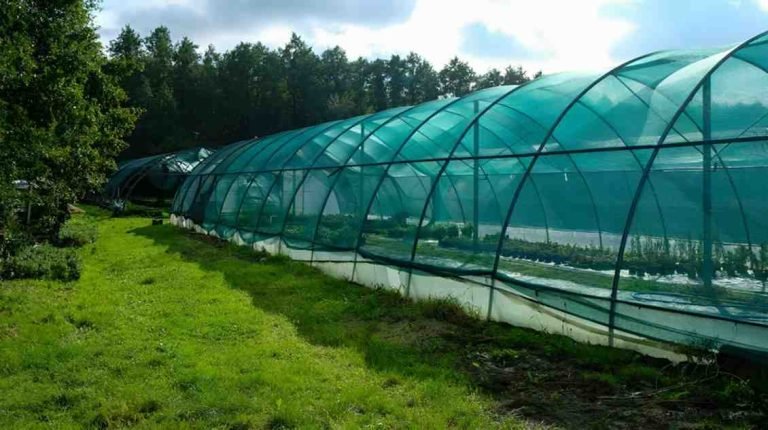
Shade nets are essential for protecting plants, crops, and outdoor spaces from extreme weather conditions while ensuring adequate ventilation and sunlight penetration. Whether you’re setting up a shade net for agricultural, gardening, or industrial purposes, a proper installation is crucial to maximize its effectiveness. This blog will provide a step-by-step guide on how to install shade nets and shed light on installation costs. We will also explore the benefits of shade net houses and highlight trusted shade net manufacturers for quality materials.
Why Install a Shade Net?
Shade nets are versatile and provide numerous benefits, such as:
- Protecting crops and plants from harsh sunlight, wind, and pests.
- Maintaining optimal temperature and humidity for growth.
- Enhancing energy efficiency in greenhouses.
For detailed benefits, read about shade net house benefits.
Step-by-Step Guide: How to Install Shade Net
Step 1: Select the Right Shade Net
Before installation, choose a shade net with the appropriate shading percentage. Depending on your requirements, you may need nets with 50% to 90% shading, commonly used in greenhouses, gardens, or outdoor areas.
Step 2: Gather Materials and Tools
You’ll need:
- Shade net
- Support poles (steel, wood, or concrete)
- Hooks, ties, or clips
- Measuring tape
- A ladder and safety gear
Step 3: Plan the Installation Area
Identify the area where the shade net will be installed. Mark the boundaries and ensure there is sufficient space for proper tensioning.
Step 4: Install Support Poles
Place support poles at regular intervals along the marked boundary. For stability, anchor the poles securely into the ground, especially in windy areas. Concrete or steel poles are recommended for durability.
Step 5: Fix the Shade Net
Attach the shade net to the poles using hooks, ties, or clips. Begin at one corner and stretch the net tightly to avoid sagging. Secure all corners and edges for uniform tension.
Step 6: Inspect and Adjust
Once installed, check for loose sections or areas prone to wear and tear. Adjust the net as needed to ensure maximum coverage and protection.
Shade Net Installation Cost
The shade net installation cost depends on several factors, including:
- Type and Quality of Net: High-density polyethylene (HDPE) nets typically cost more but last longer.
- Size of the Area: Larger installations require more materials and labor.
- Support Structure: The cost of poles and fasteners can vary depending on the material used.
On average, the cost can range from $2 to $5 per square foot, excluding labor charges. For precise calculations, it is advisable to consult with professionals or your preferred shade net manufacturer.
Benefits of Shade Net Houses
Shade net houses are increasingly popular for agricultural and horticultural purposes. They offer:
- Enhanced crop yield through controlled microclimates.
- Protection against UV rays, pests, and harsh weather.
- Energy savings compared to traditional greenhouses.
These benefits make shade net houses an excellent investment for sustainable farming and gardening.
Why Choose a Reliable Shade Net Manufacturer?
Selecting the right shade net manufacturer ensures you get durable, high-quality nets that withstand harsh environmental conditions. Reliable suppliers also provide customized solutions based on your requirements, ensuring you achieve optimal results.
Conclusion
Installing a shade net is an effective way to protect your crops, gardens, and outdoor areas while improving efficiency. Following the steps outlined above ensures a smooth installation process, and understanding the associated costs helps in budgeting. Additionally, choosing a trusted shade net manufacturer can save you time and money in the long run.
By integrating essential tips and insights, this blog aims to simplify the process of how to install shade nets while highlighting the importance of reliable materials and proper planning.
Also, You Can Read: Choosing the Right Shade Cloth for Your Greenhouse