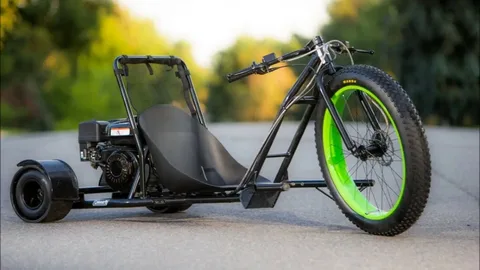
Drift-trike s provide an adrenaline-fuelled experience with their unique design tailored for downhill racing. These specialised tricycles have a robust frame, specific wheel configurations, and a rear axle optimised for drifting. Riders can enjoy controlled slides around corners, making the activity exciting and challenging. Enthusiasts often find building their drift-trike s rewarding, combining creativity and mechanical skills. With the correct materials and construction techniques, a custom drift trike can offer an unparalleled riding experience, blending speed with precision control.
Collecting Materials
Before beginning the construction of a drift-trike , it is essential to gather all necessary materials to ensure the build is functional and safe. Key components include a durable metal frame, high-quality wheels, a strong rear axle, and an efficient brake system for control. Additional essentials include a comfortable seat, adjustable handlebars, and a sturdy front fork for proper handling and stability. These materials can be sourced from local hardware stores, online retailers, or specialised bicycle shops. Ensuring compatibility between all parts and selecting high-grade materials is crucial for the trike’s longevity, performance, and rider safety.
Choosing the Appropriate Frame
When selecting the right frame for a drifting trike, it’s crucial to prioritise both strength and compatibility with other components. Metal frames, particularly steel or aluminium, are ideal due to their durability and ability to withstand the intense forces involved in drifting. Repurposing frames from old bicycles can also be cost-effective and sustainable as long as the frame is thoroughly inspected for any damage or signs of wear that could compromise safety. Additionally, the frame should align with the overall design of the trike, ensuring secure attachment points for the seat, handlebars, and other essential parts.
Choose the Right Tires
When building your drift-trike , selecting the proper tyres is essential for performance and safety. The right tyres can enhance your drifting ability, providing control and stability. Below are key points when choosing the perfect tyres for your drift-trike .
Tire Material
The material of your tyre affects its grip and durability. You’ll want a tyre with enough slickness to slide but not too much to become uncontrollable for drifting.
Tyre Size
The size of the tyre is crucial for balance. A larger rear tyre will give you more stability, while smaller tyres can offer greater maneuverability.
Tire Tread Pattern
Tyres without a deep tread pattern are ideal for drifting. A smooth or minimal tread design allows the tyre to lose traction easily, aiding in drifting maneuvers.
Tire Hardness
Soft tyres provide better grip, while harder tyres allow for more drifting. Consider using harder rear tyres for drifting, as they will slide more easily.
Tire Pressure
Proper tyre pressure ensures optimal handling. Too much air can cause oversteering, while too little can result in less control. Adjust tyre pressure according to your drifting style.
Selecting the Wheels
The choice of wheels plays a crucial role in the drift-trike ‘s overall performance. A larger bicycle wheel is often selected for the front, providing enhanced stability and control during rides. The rear wheels, typically constructed from durable plastic, are smaller and designed to reduce traction, facilitating the drifting action. Considering both size and material, ensuring these wheels are compatible with the frame and rear axle is essential. Properly selected wheels contribute to the trike’s ability to achieve smooth and controlled drifts, making the riding experience more enjoyable and efficient.
Rear Axle Assembly
The rear axle assembly is a critical component of a drift-trike , playing a key role in its performance and stability. The two rear wheels are securely connected to the trike’s frame using a durable metal rod. Ensuring the axle’s stability involves selecting the correct fasteners and carefully aligning the assembly to prevent misalignment. The axle must spin freely, without interference, to ensure smooth and efficient drifting. The assembly process requires precise measurements and secure attachments to maintain balance, control, and optimal handling during rides. Proper alignment of the axle with the frame is fundamental to the trike’s overall functionality.
Transform Your Ride: Building a Custom Adult Drift Trike
Building your drift-trike is a rewarding project that offers a fun and customised riding experience. Gather the necessary materials, including a sturdy frame, wheels, axle, handlebars, and a seat. A strong steel frame is essential for durability and stability, while the wheels should be able to withstand the stress of high-speed drifting. You’ll also need a reliable braking system and a comfortable seat to ensure safety and comfort while riding.
The second step involves assembling the frame. Cut and weld the frame pieces, ensuring they are strong enough to support the rider’s weight and the forces during drifting. Once the frame is ready, attach the front fork and handlebars, ensuring they’re aligned properly for steering control. Now, you’re ready to add the rear wheels. For an adult drift trike, it’s recommended to use a combination of slick rear tyres and a solid axle, which allows for better drifting control on smooth surfaces.
Finally, complete your trike by attaching the seat and finishing touches, such as grips, decals, and protective elements. After the assembly, test your creation in a safe, open space to ensure everything functions as expected. With the right materials and attention to detail, you’ll have a custom adult drift-trike ready for thrilling rides!
Brake Installation
Installing brakes on a drift-trike is crucial, as it focuses on ensuring reliable stopping power. Disc brakes or V-brakes are typically chosen for their effectiveness. The brake mechanism is attached to the front wheel, with brake cables running to the handlebars. Following the manufacturer’s guidelines during installation is essential for optimal performance. Each component must be securely fastened, and alignment should be carefully checked. Rigorous testing of the brakes under various conditions is recommended to confirm their functionality and safety, guaranteeing the drift-trike can be controlled effectively during use.
Seat Construction
The seat of a drift-trike is designed to provide both comfort and stability. Utilising foam padding covered with durable fabric ensures that the seat remains comfortable during extended use. Attachment involves securing the seat to the frame with bolts and brackets, ensuring it can endure the forces encountered while drifting. Adjustments are often made to accommodate the rider’s height and posture, contributing to better control and a more enjoyable riding experience. The seat must be firmly fixed, reducing any risk of movement that could affect the trike’s balance and safety.
Install the Front Fork and Steering Mechanism
Proper front fork and steering mechanism installation ensures smooth handling and control of your drift-trike . Follow these steps to complete this essential part of the build.
Prepare the Front Fork
Start by selecting a suitable front fork for your drift-trike . Ensure that the fork is durable and fits your wheel size. The fork should have a clean, smooth finish to avoid friction when turning.
Attach the Steering Stem
Next, attach the steering stem to the fork. Secure it tightly, as this will be key to controlling the trike’s direction. Make sure it aligns properly with the frame for smooth operation.
Install the Front Wheel
Place the front wheel into the fork’s dropouts. Tighten the wheel nuts or quick-release mechanism to ensure the wheel is secure and will not come loose while riding.
Mount the Handlebar
Fix the handlebar to the top of the steering stem. Adjust its height and angle according to your preference, ensuring comfort and control.
Test the Steering Mechanism
Once everything is securely installed, test the steering by turning the handlebars and checking for smooth movement. Ensure there’s no obstruction or resistance, allowing easy turns.
Handlebars Attachment
Handlebars play a critical role in steering and control. When attaching handlebars to the drift-trike , selecting a type that provides comfort and optimal control is important. Proper attachment involves securing the handlebars to the front fork, usually with a clamp mechanism. The height and angle of the handlebars should be adjusted to suit the rider’s preference and enhance manoeuvrability. Using high-quality materials and ensuring a secure fitment prevents unwanted movement, thus maintaining steering precision. The chosen handlebars should also be ergonomically designed to reduce fatigue during prolonged use.
Painting and Final Touches
Painting a drift-trike adds a personal and creative element to the project. Using durable paint suitable for metal surfaces ensures longevity. Before painting, the frame and components should be thoroughly cleaned and primed for better paint adhesion. Applying multiple thin coats can achieve a smoother finish and reduce the risk of runs or drips. Creative designs like stripes, patterns, or logos can be incorporated to personalise the trike. Once the paint has dried, additional protective clear coats can be applied for added durability. Beyond aesthetics, a final inspection of all fasteners and moving parts guarantees everything is securely in place, contributing to the trike’s overall performance and safety.
Safety Protocols and Equipment
Protective gear is crucial for safety when drifting, as it helps prevent serious injuries during high-speed maneuvers. Helmets, knee, and elbow pads offer essential protection, safeguarding the rider from potential falls and impacts. In addition to personal safety, maintaining the drift-trike itself is just as important. Regular inspections of key components such as the brakes, wheels, and frame are necessary to ensure they are functioning properly and free from wear or damage. By staying on top of these maintenance checks and wearing proper safety equipment, riders can enjoy the adrenaline rush of drift triking with a significantly reduced risk of injury.
Conclusion
Building your drift-trike can be a thrilling project that challenges your mechanical skills and provides a fun, custom ride. With the right materials, tools, and patience, you can create a high-performance drift trike suited to your preferences. Safety is key, so always wear protective gear and test your trike in safe, open areas. Once your drift-trike is ready, enjoy the smooth, controlled drifting experience that will bring excitement and satisfaction for years.
FAQ’s
How long does it take to build a drift trike?
Building a drift trike typically takes 1-2 weeks, depending on your experience and the availability of materials. If you’re new to DIY projects, it might take longer due to the need for careful planning and assembly.
What materials do I need to build a drift-trike ?
For the main structure, you’ll need a sturdy frame, preferably steel. The front fork can be a mountain bike fork or similar. The rear wheels should be large, durable, and covered with PVC pipe for drifting. For safety, remember handlebars, a seat, and brakes.
Can I modify my drift-trike after building it?
Absolutely! After completing your drift-trike , you can upgrade components like wheels, tyres, or the seat for enhanced comfort or performance. Many people also add custom paint jobs or stickers to personalise their trikes.
What is the best place to ride a drift-trike ?
Drift-trike s are best ridden on smooth, open spaces like parking lots, closed roads, or empty driveways. Ensure there are no obstacles and the surface is not too rough to allow for safe drifting.
How do I ensure my drift-trike is safe to ride?
Before riding, thoroughly inspect your drift-trike to ensure that all parts are securely fastened. Always wear protective gear like helmets and elbow and knee pads. Start slow and practice in a controlled environment until you’re comfortable.


