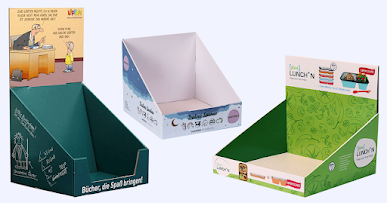
Retail counter displays are ideal for product promotion. They’re attractive and tidy, so buyers will check out your stuff. Counter Displays can encourage impulsive purchases, which may boost sales. However, retailers and business outlets need to set up them by themselves. Assembly and setup of counter display boxes is no rocket science.
You only require a little knowledge about the process to take their full leverage. Here is a step-by-step instructional guide for assembling these fantasizing boxes. Moreover, you would also learn in this guide about ensuring their sturdy construction and making this process a lot easier.
Supplies Required for Assembly and Setup of Counter Display Boxes
There is some basic and necessary equipment that you would need for the assembly and setup of counter display boxes.
- A kit for a counter display box comprising the necessary cardboard components, glue, and instructions.
- Transparent or custom tape
- Scissors or another kind of cutting instrument
Instructions in Detail, Step by Step process:
Step 1: Unbox and organize the material
These boxes are shipped flat by the packaging firms in the form of a complete kit. Therefore, remove all of the components from the counter display box kit first and arrange them out on a flat surface. Prepare the pieces of cardboard and the glue by arranging them in a way that makes them simple to reach throughout the assembling process. Read over the instructions given below and master the art of assembling these boxes within seconds.
Step 2: Make the base ready
The next step in the assembly and setup of counter display boxes wholesale is determining which portion of the counter display box serves as the foundation. To form the shape of the base, fold along the lines that have been scored. Put some glue on the tab wholesale counter display boxes and then bind them to the neighboring sides of the box so that they create the foundation. Make sure you use enough force to get a good bond. If instructed to do so by the glue’s manufacturer, wait for the adhesive to completely dry before proceeding.
Step 3: Shape the back and sides
Fold the rear panel of the display box along the scored lines using the back panel as a guide. After applying glue to the tabs, attach them to the edges of the base that are next to them. The framework of the display box forms using this on the back and sides. Keep the components together until the glue has had time to take effect.
Step 4: Attach the Shelves to the Wall
In this part of the assembly and setup of custom counter display boxes, you would need to attach the shelves to the walls that will hold items. In most cases, this entails folding the shelf parts and fastening them using glue in a folded position. After constructing the box, attach the shelves to it at the correct height. Check that they are level and that they are connected securely.
Step 5: Constructing the top Header
The step of constructing the head or back wall panel comes after attaching the shelves to the walls. It is also popular as the header card. This is the top area of the display box and helps to highlight the logo and also a brand statement along with a little information about the product. Apply some glue to the top of the rear panel of the box and attach it there.
Step 6: Complete the Box
Along the scored lines, fold the remaining sides of the display box (the front and sides). Apply glue to the tabs and then carefully attach them to the sides of the base that corresponds to them. Make sure you use enough force to get a good bond. Moreover, wait for the glue to harden as per directions provided by the manufacturer.
Step 7: Secure it with clear tape
Clear or custom tape is ideal to strengthen the interior edges of the display box. It will give the box an additional layer of resilience. This step is not mandatory. However, doing so will assist in improving the overall stability of the box, which is particularly important if it is going to have heavier and taller items in it.
Read More: Empireadda
Step 8: Arrange the Products in the Store
After the display box has been completely put together, you may arrange your items on the shelves in any way that you choose. Also, make sure the weight is spread evenly throughout the platform to avoid it from toppling over.
Advice for a Robust Construction and an Uncomplicated Assembly
- Be sure to pay close attention to the assembly instructions that are included with the kit as well. The display box designs may call for a variety of alternative approaches.
- When putting together the box, you should work on a surface that is both clean and flat. This assists in preserving the strength of the cardboard and assures that the finished product will be straight.
- To form a strong connection, be sure to firmly press down on the sticky tabs. Moreover, it is helpful for the glue to be held together for a few seconds so that it may be fully set after the parts have been attached.
- If you are using the box for heavy items, reinforce key spots on the interior using tape to offer an additional layer of safety.
- Before you start folding and putting everything together, you may want to give it a test run without the glue to get a feel for how the process works.
- It is important to avoid moving too quickly during the assembling process. A more finished and professional-looking project will be the end consequence of taking your time and paying attention to the details.
Conclusion:
The overall assembly and setup of counter display boxes were that simple. Care about constructing them in perfect shape to depict professionalism. It will attract the attention of more customers at the countertops. You will be able to construct and set up counter display boxes that successfully promote your items while assuring their longevity and stability by following these step-by-step instructions carefully.


