
Installing a wood-burning stove can transform your home into a cozy, energy-efficient haven, particularly in colder months. While the thought of installing a wood-burning stove might seem daunting, it’s a rewarding project that can be done with the right tools, knowledge, and guidance. This beginner’s guide will walk you through the process of installing a wood-burning stove safely and efficiently.
For high-quality stoves and installation accessories, consider checking out Caledonian Stoves, a leading source for premium wood-burning stoves.
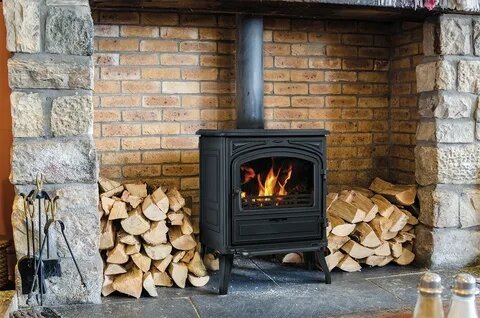
1. Choose the Right Stove for Your Home
Before you start the Wood burning stove installation, it’s essential to choose the right stove for your home. The stove should fit your heating needs, room size, and design preferences. Here are key factors to consider when selecting a wood-burning stove:
- Size and Heat Output: Measure your room size to ensure you choose a stove with adequate heat output. Wood-burning stoves are measured in BTUs (British Thermal Units) or kW (kilowatts). Larger rooms will require higher BTU ratings, while smaller spaces need less powerful stoves.
- Efficiency: Look for stoves with high efficiency ratings to make the most of the fuel you burn. An efficient stove will burn wood more cleanly and provide more heat with less wood.
- Design: Whether you want a traditional cast-iron look or a sleek modern stove, select a model that complements your home’s aesthetic.
2. Select the Right Location
Once you have the stove, the next step is choosing the best location for installation. The stove’s location is critical for heat distribution, safety, and efficiency. Here’s what to consider:
- Central Placement: Installing the stove in the center of the room ensures even heat distribution. Avoid placing the stove in an enclosed area or tight corner, as this can reduce its heating efficiency.
- Clearances: Maintain safe distances from combustible materials such as walls, furniture, or curtains. Most manufacturers provide guidelines on minimum clearance distances, which are typically around 36 inches from walls. Using a heat shield can help reduce these clearance requirements.
- Chimney or Flue Access: The stove must be connected to a chimney or flue for proper ventilation. If you already have a chimney, ensure it’s in good condition. If not, plan to install a flue system.
3. Gather the Necessary Tools and Materials
Before starting the installation, gather all the necessary tools and materials. These typically include:
- Stainless Steel Flue Pipe: For venting the stove, ensure the pipe is properly insulated and the right size for your stove model.
- Stove Pipe Adapter: To connect the stove to the flue or chimney.
- Fire-Resistant Hearth Pad: A non-combustible base for the stove to sit on, typically made of stone, tile, or brick.
- Heat-Resistant Sealant: To seal the joints between the stove and the flue pipe.
- Carbon Monoxide Detector: An essential safety feature to detect carbon monoxide leaks.
4. Install a Proper Hearth
The hearth is the base upon which your wood-burning stove will sit. It must be made of a non-combustible material to prevent heat damage to the floor. Follow these steps to install a proper hearth:
- Measure the Area: The hearth should extend at least 18 inches in front of the stove and 12 inches on the sides to catch stray embers.
- Install the Hearth Pad: Lay down the hearth pad or build a base with fire-resistant materials like tile, brick, or stone. Ensure the hearth is level, as an uneven base can affect the stove’s stability.
Once the hearth is in place, you’re ready to move on to the next step.
5. Set Up the Stove
Now that the hearth is ready, it’s time to place the stove in position:
- Position the Stove: Place the stove on the hearth, ensuring it sits at the correct clearances from walls and furniture. Use a spirit level to check that the stove is even.
- Align with the Flue: If you’re using an existing chimney, align the stove with the chimney opening. For new installations, make sure the flue pipe will run straight or with minimal bends to improve draft efficiency.
6. Install the Flue Pipe
Installing the flue pipe correctly is crucial for venting smoke and gases out of your home. Follow these steps to ensure a safe installation:
- Connect the Flue Pipe: Attach the flue pipe to the stove using the appropriate stove pipe adapter. Ensure the connection is tight and use high-temperature sealant to seal any gaps.
- Vertical Flue Installation: If your stove is venting vertically through a ceiling, extend the flue pipe up through the ceiling and roof. Be sure to use a double-wall insulated pipe to prevent heat loss and fire risks.
- Horizontal Flue Installation: If you are venting horizontally through an exterior wall, create a hole in the wall, ensuring it slopes slightly downward toward the outside to allow for proper drainage of condensation.
- Install the Chimney Cap: Add a chimney cap or flue cap to prevent debris, rain, or animals from entering the flue. The cap should allow for adequate airflow while protecting the venting system.
7. Test for Draft and Functionality
Before lighting your first fire, test the stove to ensure proper draft and functionality:
- Check the Draft: Open the air vents on the stove and light a small fire with kindling. Observe how the smoke travels up the flue or chimney. There should be a clear upward flow of smoke, indicating a good draft.
- Seal Any Leaks: Inspect the stove and flue pipe connections for any smoke leaks. If you notice any gaps, apply more heat-resistant sealant.
- Carbon Monoxide Test: Install a carbon monoxide detector near the stove to monitor for any dangerous leaks.
8. Maintain Safe Operation
After successfully installing your wood-burning stove, regular maintenance is crucial to ensure safe and efficient operation:
- Chimney Cleaning: Over time, creosote can build up in the chimney, which is a fire hazard. Have your chimney cleaned annually by a professional to reduce the risk of chimney fires.
- Stove Cleaning: Remove ash and soot from the stove regularly. Clean the stove’s glass door to keep it clear and free of residue, ensuring that it operates efficiently.
- Check Seals and Gaskets: Inspect the stove’s seals and gaskets periodically for wear and tear. Replace any damaged parts to maintain a good seal and efficient operation.
9. Meet Local Building Codes
Before starting your stove installation, it’s important to check local building codes and regulations:
- Permits: In many areas, you’ll need a building permit for installing a wood-burning stove, especially if you’re adding a new chimney or flue system.
- Safety Inspections: After installation, have your stove inspected by a qualified professional to ensure it meets local safety standards.
Conclusion
Installing a wood-burning stove can seem like a challenging task for beginners, but by following the right steps, it’s a manageable DIY project. From selecting the right stove to ensuring proper venting and safety precautions, each step plays a crucial role in successful stove installation.
For top-notch stoves and accessories, Caledonian Stoves is the ideal destination. They provide expert advice and a wide selection of stoves and installation materials to help you get your project done safely and efficiently. With the right tools and knowledge, you’ll be enjoying the warmth and ambiance of your wood-burning stove in no time.

